For me, if you want to back your computer state when you first bought it then you need to do factory settings. This includes the OS with all the third-party software they like to install with it. However, this may not be the most ideal choice.
Depending on how you look at it and version of Windows you are running, factory settings can mean several things. Oddly enough, I’ve been asked by many people recently how they can restore their computers to “factory settings”. Restoring a computer to its factory settings will delete all personal files: music, movies, pictures and any installed software applications or drivers that were not included in the original configuration of that computer.
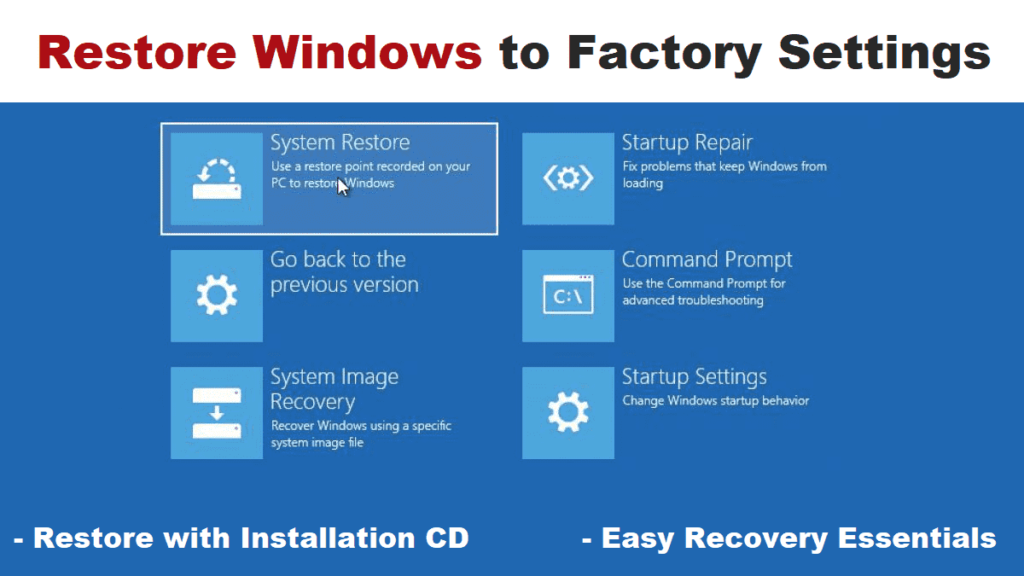
Alternatively, performing a system restore reverts the OS to a previous state, which is not exactly like a clean install, but could help you get your system working properly. This is a good option if your system has become infected with a virus or malware you can’t remove, but your data is clean. My recommendation is to perform a clean install, which is better than restoring the factory image that you either get on DVD or that is located on a hidden partition in the hard drive.
Restore Windows XP to factory settings
If you have not any tools for factory settings from the PC manufacturer then use the following tools from Windows XP itself to reset a computer to its factory settings:
- Restore with installation CD.
- Easy Recovery Essentials.
Restore with Installation CD
Step 1: Start your the computer. And insert the original disc in the disc tray.
Step 2: Press any key when the computers shows the “Press any key to boot from CD” message.
Step 3: Wait for the Windows XP CD to load.
Step 4: When you see Welcome to Setup screen, press Enter to access Repair Install.
Note: Do not press R. You don’t need access to Recovery Console, but the Repair Install.
Step 5: Press F8 to agree because you must agree to the End-Use License Agreement.
Step 6: Next screen you make sure that you have the drive where you have Windows XP is installed highlighted.
This is usually presented as: C:\Windows “Microsoft Windows XP Professional”
Step 7: Confirm that Set Up presents you with these 2 choices:
press R for repair the selected Windows XP installation,
and
To continue installing a fresh copy of Windows XP without repairing, press ESC.
Note: If you don’t have the “press R” option, you can’t perform a Repair Install.
Step 8: Once highlighted, press R.
Step 9: You need to wait for the process to perform Repair Install.
Step 10: After this windows XP Setup will begin to install the operating system again.
Step 11: Continue with the steps of the wizard to setup the system again.
Easy Recovery Essentials
Step 1: First You need to Download Easy Recovery Essentials.
Step 2: Burn the ISO image.
Step 3: Boot Easy Recovery Essentials
Step 4: Select Windows XP from the list and click System Restore.
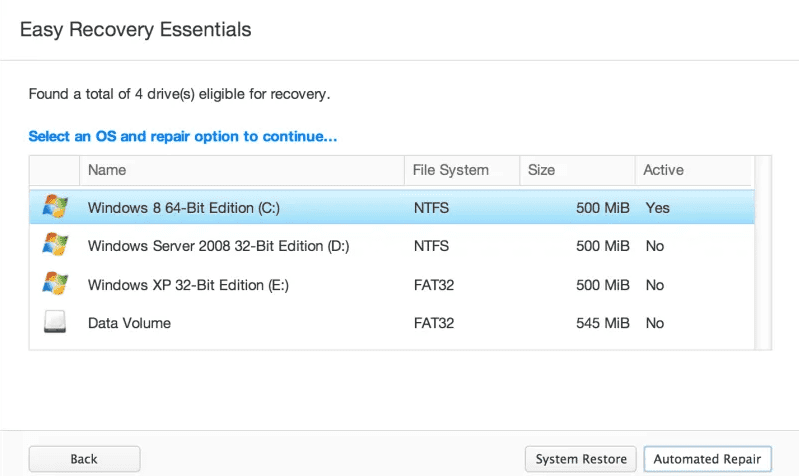
Step 5: Choose a restore point.

Step 6: Easy Recovery Essentials will now create a backup of your current system configuration and begin restoring the selected snapshot.
Step 7: Once the process is complete, click Restart.
Step 8: Done! Your Windows XP should now start again.