Today we will learn you how to convert video into GIF using Photoshop CC Design Tool. A lot of times, the creators take a video, convert the whole thing into an animated GIF, and then superimpose text to make it entertaining. I am using Photoshop CC to convert video to GIF because it allows you to have more control over the final product in terms of size, quality, frames, etc.
Steps to Create a GIF from a Video using Photoshop CC
Step 1: Convert Video Before Importing. You need to convert media file into video formate.
If you will import unsupported video formate then it will show error message like,
Could not complete the Video Frames to Layers command because the file has no video frames.
The video was a MOV file, but the codec that Apple uses is not supported in Photoshop. In order to fix this type of problem, you need to download a program like HandBrake to convert the video.
Once it has been converted to an MP4 file using the H.264 video codec, we can now import it into Photoshop.
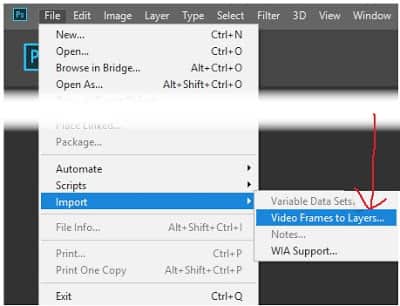
Step 2: Open Photoshop CC and click on File, then Import and then Video Frames to Layers.
Step 3: Select your video file and click Open. Now one dialog will open with a small preview of the video and a couple of options.
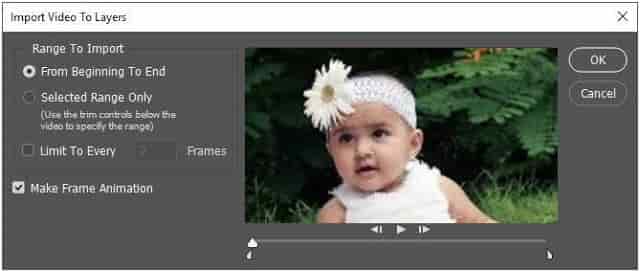
Now if you want the entire video as an animated GIF, go ahead and leave the radio button From Beginning to End. If you only need a portion, choose Selected Range Only and then use the trim controls below the video to pick the range.
Lastly, you need to make sure the Make Frame Animation box is checked. Click OK and your video should be imported as a bunch of frames in Photoshop.
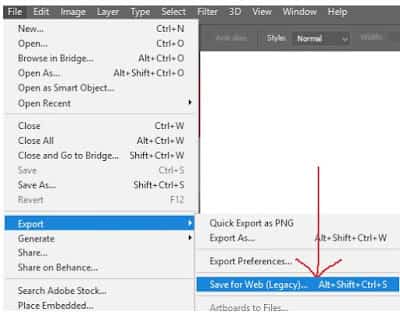
Step 4: Now all we have to do is save the frames as an animated GIF.
you need to click on File – Export – Save for Web (legacy). Note that before saving it out as a GIF, you can edit and delete frames as desired.
Once you click on Save for Web (legacy) menu, one dialog box will open. On that dialog box make sure that GIF is selected in the drop-down below Preset. Last, click Save and choose a location to save your GIF.
You’ll Also Like:
How To Check Your Google And Facebook-Connected Apps
Best Website For Online Alphabetical Order Sorter